Let’s say that on a very fine day you have an idea for an app. Then you think for yourself, “do I have to get a designer to do this?” If this app is something you do on the side, this brings on another set of questions around resourcing – where to get good enough designers, how much can you budget of them (which indirectly determines what kind of designers are you able to hire), and a whole other stuff. Then the problem starts to grow.
But don’t panic. You can design apps by yourself – even if you’ve never went to design school or don’t know how to operate Photoshop or Illustrator. How? Read on.
Getting Started
If you want to become a food critic or you want to be a chef, you’ll need to develop taste for good food. There’s no way around it. You’ll need to be able to identify what’s good, what’s bad, and what’s gross. Accordingly you’ll need to develop your sense of good apps. You’ll need to be able to distinguish which apps has good design and which ones that were just slapped together.
The best way develop good taste for apps is really just to dive in: immerse yourself in some great apps – but apps that you’ll actually use. Where can you find these? A good place to start is to look a the Apple Design Awards winners and see if you can find some apps that you’ll actually use from that collection (Wikipedia has a list of these winners since the award started).
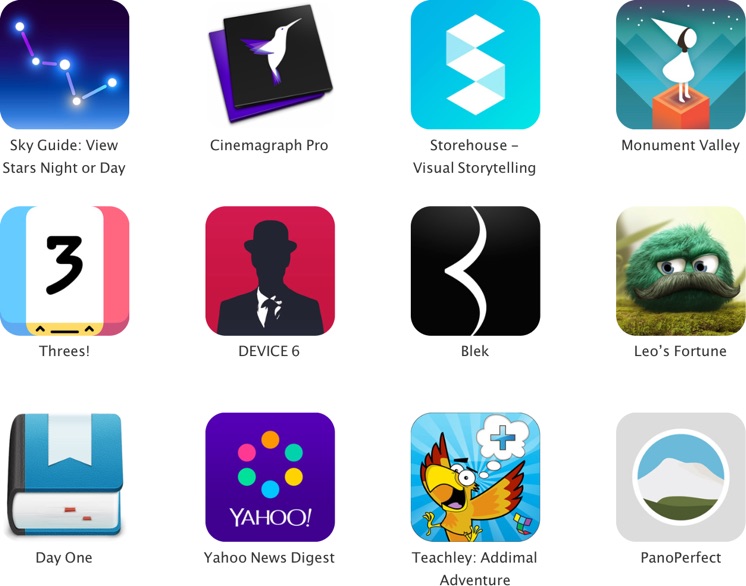
You can also simply look around or ask other people who already have acquired good taste in apps. Here is an arbitrary list of good looking apps that I personally use:
- Day One (a journal keeping application).
- MoneyWell for iPad (a personal finance app).
- Xscope (a ruler. really.)
- Keynote (presentation software, better than PowerPoint).
“But these are Mac or iOS applications,” you might think. Yes, unfortunately they are. Users for these platforms tend to appreciate well-designed apps – as well as developers and Apple itself. People who like good looking apps tend to gravitate towards these platforms and the developers are just meeting customers’ demands. Other platforms’ communities may appreciate other aspects more and hence the developers optimize in those areas. Like when Casey Liss (a Windows developer) was asked, “Where are the good Windows apps?” he the bluntly said “games, mostly” – and that’s true, as of this writing the great desktop games are launched mostly on Windows first and often exclusively to Windows.
Just as different people have different tastes and may not agree on what may be considered good food, the same goes for apps. Different categories of apps have their own styles catering for their respective markets. Some markets prefer command-line interactions, some others like to have many buttons and toggles to tinker with, whereas others prefer the least amount of UI elements and dedicate much of the screen real estate on what they’re working on.
Steve Jobs once said “good artists copy, great artists steal”. Then you’ll need to initially copy the works of artists that have “made it” before you. Remember that to be a great artist you’ll need to be a good artist first – learn to walk before you run. Hence it’s okay to copy great works to “learn the ropes” before you improvise your mashup and “steal”.
Having and using good apps can only take you so far in developing your taste. Another method is to look at other designers’ prototypes and works. Like browsing in Dribbble for example – get to see what real designers are doing and learn from their works.
From Thought to Tangible
The following the process that you should take when designing new end-user applications:
- Determine audience
- Identify competitors and complements
- Create a rough sketch
- Create digital interactive prototypes
- Get feedback from people
More in Detail
Before you start designing an application you’ll need to determine who is your audience. In other words, you need to select your target market – the demographic of your primary user base. This underpins all other decisions that you make. For example if your primary aim is towards people who like to customize every aspect of their experience then you’ll want to make sure that your app has plenty options to configure and ideally skinnable, scriptable, and support for every kind of plug-in imaginable. However if you’re aiming for people who like the “just works” experience then you’ll need to minimize configurable options and strive for the best defaults as much as possible. You can’t please everyone, really – and you shouldn’t even try or you’ll end up pleasing no one.
The next step is to identify your competitors after having identified your audience. Knowing your competitors has twofold advantages. First you’ll get to leverage on their research – find out what works and what doesn’t by looking at how they design their applications. Second you’ll be able to position yourself among your candidate competitors – strategize on how you’d like the application to be seen and compared with among others that came before it.
You’ll also need to identify your complements – which other applications or services that will work well with yours. One reason is to help you reach in to their markets by informing the target user that you application is going to work well with these. Another is to potentially carve a cross-promotional (or bundle) deal with these other companies. When done correctly you can leverage on their brand to help introduce your application.
Having done all these pre-work in place, you should now have enough information to draft rough sketches of your application. Nothing fancy, just pencil-and-paper mockups to get the concepts pinned down. But you’ll need to do it iteratively and thus you shouldn’t invest too much work polishing a single concept. It would also be good to discuss these sketches out with people from your target demographic and get valuable input on who they’ll use the application.
From these raw sketches then you’ll need to create a digital interactive version of the application. What you’ll need to make this is software that can place pictures and make them able to respond to clicks to display other sets of images. There are plenty of software that can do this, but if you’re just starting I’d recommend Keynote for this task. Yes it’s a presentation software and not a specifically designed mockup application. But you can make it display fake screens with hyperlinks that displays other fake screens – which is pretty good as a starting point.
Place this interactive mockup in the actual device that you’re going to test is and get feedback from real potential users. See if they understand it. For designs of mobile applications, try it both outdoors and indoors and see how your choices fare in the different environments. If your target audience involves people with degrading eyesight, also get feedback from them of your design.
There are a few applications that can help you create interactive mockups – here are a few.
- Keynote – create a hyperlinked set of slides that can be shown using Keynote for iOS or exported as hyperlinked PDF and use a PDF viewer.
- PowerPoint – similar workflow to Keynote (hyperlinked slides) and present using the iPhone version of PowerPoint (so that hyperlinks are preserved) or use a PDF viewer such as GoodReader. On the plus side you probably can show it on a Windows Phone or Microsoft Surface as well.
- OmniGraffle – export the mockups as a hyperlinked set of slides. If you want to use this for prototyping apps, you’ll need the Pro version since it supports shared layers that is most helpful
- Balsamiq Mockups – use their web-based viewer to show the prototype.
- Axure – they have a web-based viewer that can be opened on desktops and many mobile platforms.
- Briefs – they have a specialized “runtime” for iOS that is used to show prototypes developed on their Mac app.
Armed with an interactive mockup, you should get out and show it to other people who are not directly involved with the development of the app. However it is crucial that they are a member of the app’s target demographic (i.e. the kind of people who would use such an app). A counter example is showing a baby monitor application to non-parents (or non-parents to be) – they won’t give you useful feedback.
It would be good if you can script the introduction and flow along the mockup. Similarly it would be good if you can split your mockups along the set of core interactions (likewise along the primary value propositions) that you want to test. However you might want to first test out the script with people who already know you. That way you can practice the demo and catch any gaffes before talking with a total stranger and then lost your train of conversation.
You probably don’t have much time to test out the entire flow and this is one reason why you should keep the prototypes short and focused. You shouldn’t mockup an entire app as one big hyperlinked PDF or otherwise it’ll be hard to keep the conversation focused (and you waste a lot of effort in getting those mockups functional in the first place).
Then after every session ask the test subject these questions:
- Do you know how to do this particular thing that we prototyped?
- Is it easy to do that thing?
- In general, how can we make it better?
An Example
Let’s say that you want to make a chicken rice app. An application to help users find the best chicken rice, rate chicken rice, and discover the best chicken rice vendors nearby. We’ll apply the step-by-step process described earlier to get from concept to a mockup.
Target Audience
First you need to identify your target audience. A quick glance through Wikipedia shows that “chicken rice” shows that the phrase refers to either Hainamese chicken rice or Claypot chicken rice. There are other variants such as chicken biryani and arroz con pollo, but generally people do not use the words “chicken rice” to identify them. Both hainamese and claypot variants are popular primarily in Malaysia, Singapore, and to some extent China – hence these will be our primary demographic. Or to be more exact, “people living in Malaysia, Singapore, or China who likes to eat outside and enjoys chicken rice.”
Competitors and Complements
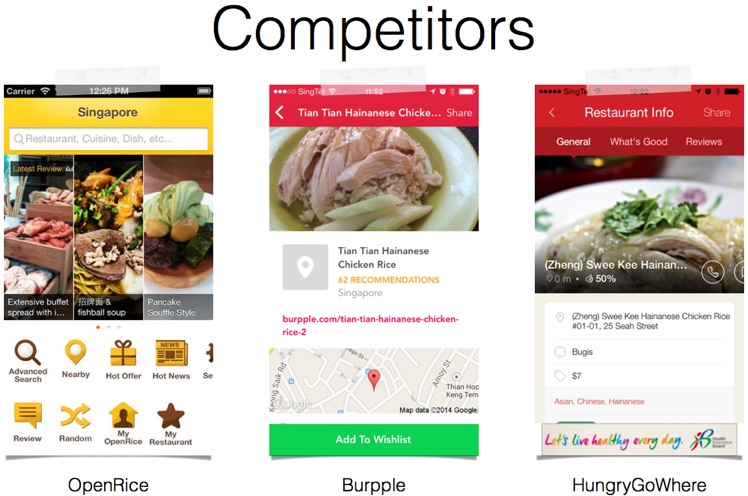
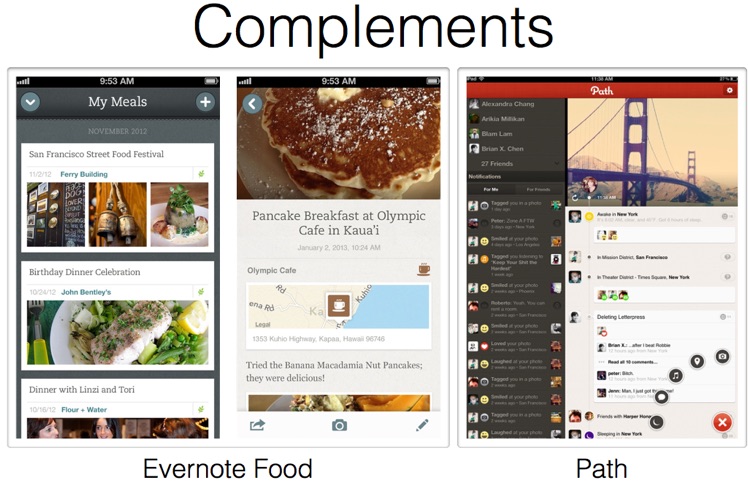
The next step is to identify our competitors and complements. A quick googling around discovers a few competing products and some complementary services.
- Yelp – a restaurant review app, started out in the US and still popular over there.
- Burple – an independent food blog.
- Hungry Go Where – food blog that is part of Singtel’s conglomerate. They also have a mobile app, which makes them a competitor.
- Evernote Food – really a way for Evernote users to put more data in their accounts, hence increasing their need to upgrade and keep their Evernote Premium accounts.
- OpenRice – a dining online magazine that also has its own mobile app.
Rough Sketches
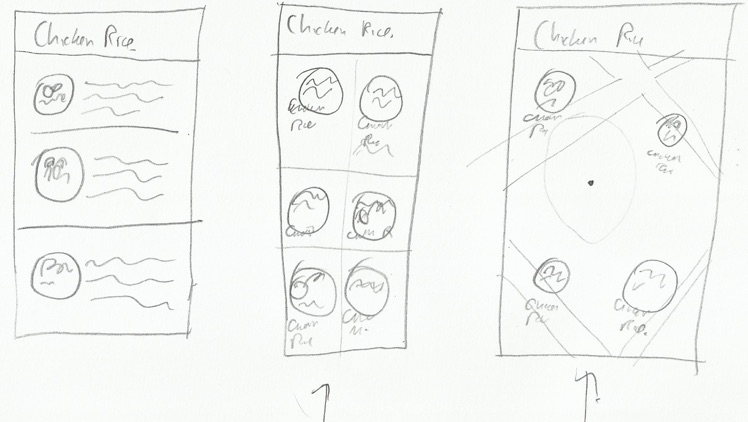
Given all these information and seeing how they solve their user problems, you’ll need to draft out some prototypes. Sketch out a few mock screens and select which ones that will resonate best. Try to learn from your competitors which should reflect what works best with their users.
Digital Interactive Prototype
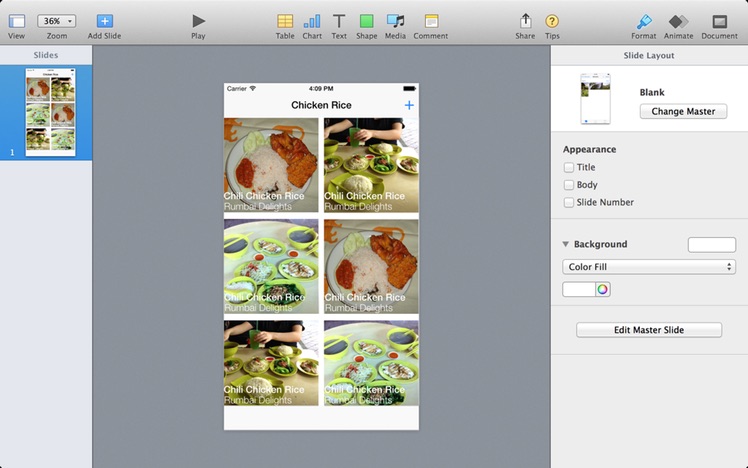
For now let’s choose the grid view of chicken rice and a map of venues for chicken rice and make up a realistic interactive mockup of it. We’ll narrow it down to the primary flow of browsing photos of chicken rice on a grid and finding it on a map.
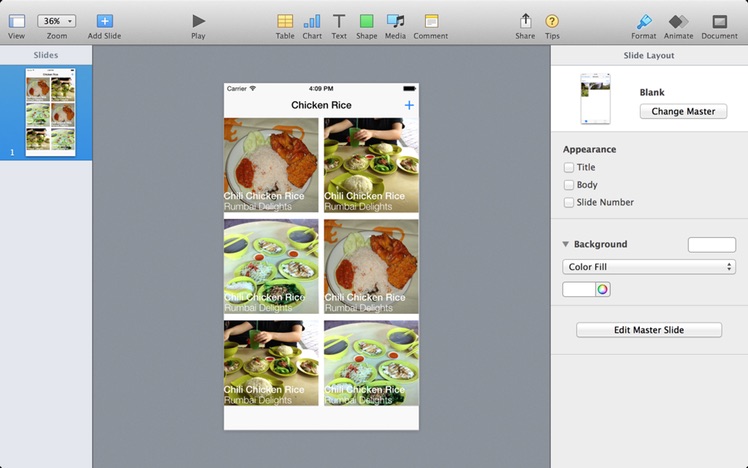
Suppose that we’ve chosen Keynote to create the mockup since we’re aiming to target iOS and want to show it using Keynote for iOS. We’ll start by creating a presentation of the size of an iPhone screen, take a picture of the Photos app and then blank out its contents by overlaying them with rectangles of the appropriate colors. Then we’ll get a screen with a blank navigation bar and blank toolbar at the correct sizes and proportions.
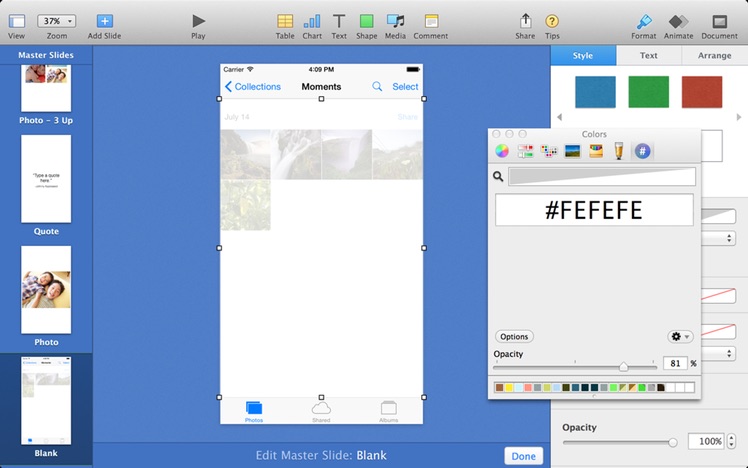
Then we’ll add our own title and sample content to the slide. For our chicken rice example, I have a set of three photographs that I took myself. You can just use a few photos and repeat them across the mockup – it doesn’t really matter for prototyping purposes.
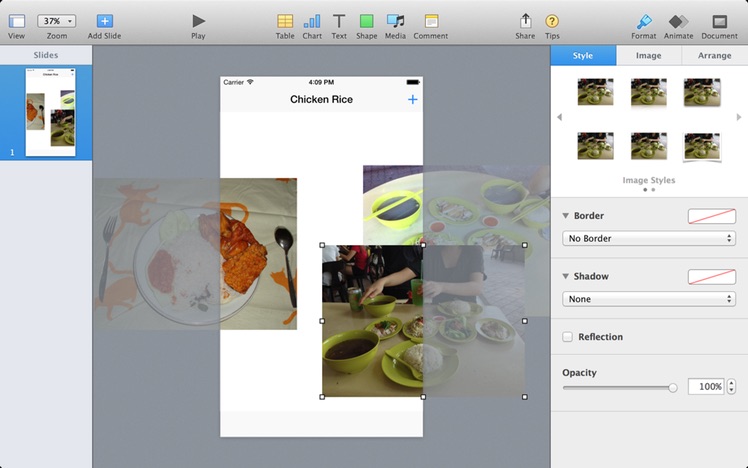
Arrange these sample contents and add captions to look similar to the real application that you have in mind. One neat trick of placing text over images is to underlay these text with faint dark gradients so that the text doesn’t collide with the image beneath it.
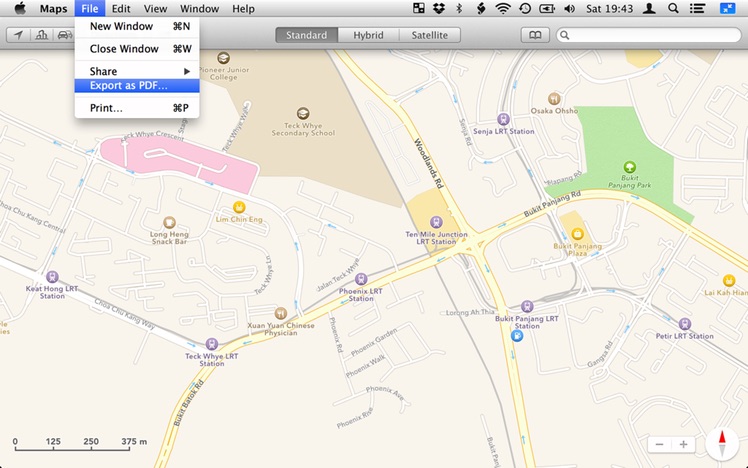
For the Map screen, let’s cheat and take an existing map image and place it inside the mockup. The Maps app bundled with Yosemite makes this really easy: just choose Export as PDF from the File menu and then import the PDF back into Keynote.
Now that we have a maps image in a new slide, we’ll place the item thumbnails on the map image, simulating an app showing places of interest.
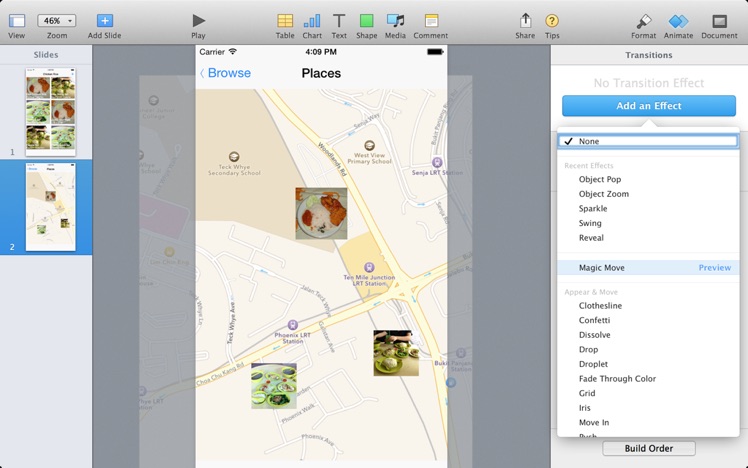
Finally we use Keynote’s magic move feature to animate the app’s transition from grid view to map view. Using a built-in animation of the prototyping app helps you to focus on the problem at hand: whether the animation makes sense and helps the user. At this point you don’t need to worry about how to do it in code – there’s a good chance that the animation may not be suitable or helpful in the first place, and thus you can save a good amount of time by proving its usefulness through a prototype.

Getting Feedback
With the prototype installed on the device, we can go out to show the interaction to our target users. Since this is a chicken rice app, we could start by finding potential early users from the foodies in our circle. Starting from Facebook would be a good idea – find those who like to go out for food and like chicken and rice by looking whether they like to post food pictures that they ate outside. Then you can take them out for dinner, show your prototype, and get feedback.
Summary
To tally up, you now know how to approach to create design prototypes of a mobile application without even needing a formal education in visual design. The steps outlined here should be applicable for many user-centered applications as well – not just mobile but designing desktop and web-based applications follows a very similar process.
Again to reiterate above all you need good taste in user interaction, which can only be obtained by first learning the patterns from successful applications, identifying which ones are good and then emulating these patterns.
Take care and good luck!
Great posting! its really helps me a lot, because it adds fuel to my determination.