Notarization is now mandatory to distribute macOS applications, plug-ins, and drivers outside the Mac App Store. You would need to present your binary package to Apple for automated registration. If it turns out that the package contains malware, Apple can prevent all macOS computers to run it. In other words, it’s a kind of centralized malware scanning.
The notarization process usually takes a few minutes to complete for a relatively small package (less than a hundred megabytes). It is quite repetitive and thus ripe for automation. That is, you can delegate the process into a continuous delivery (CD) process to save you some time in uploading and waiting for the process to complete.
Notarizing requires a paid Apple Developer Program (ADP) account. The financial transaction proves the identity of the uploader to Apple, which also should discourage developers from deliberately notarizing malware.
It follows that the automated notarization agent—your Jenkins server, for example—would need to prove its identity to Apple during notarization upload. One way for this is for the build server to provide your Apple ID and password when uploading a binary for notarization.
“But I don’t want to include passwords as part of our build jobs,” you might say. Yes including passwords in build jobs or source tree is inherently insecure. More so if you use code-based build jobs such as Jenkins Pipeline where the build job definition gets committed as part of the source tree.
But there are ways to securely commission credentials to build jobs. These are the two methods as far as macOS notarization is concerned:
- Use an API Key from App Store connect.
- Use an app-specific password owned by a technical user.
I recommend the API Key approach. But this would only be feasible when you can secure the home directory of the CD software’s technical user account. Reason is that the approach involves authentication from a private key file that is stored in a subfolder of the home directory.
Configuring API Key for Notarization
In this context, an API Key is really a pair of asymmetric encryption keys to authenticate against Apple’s back-end. These keys are generated by Apple in which it would keep the public key half and you would need to keep the corresponding private key. It is this private key that you would provide to build jobs to authenticate itself to Apple.
Generate the API Key
Follow these steps to generate an API Key
- Login to App Store Connect as a user with admin rights on the ADP account.
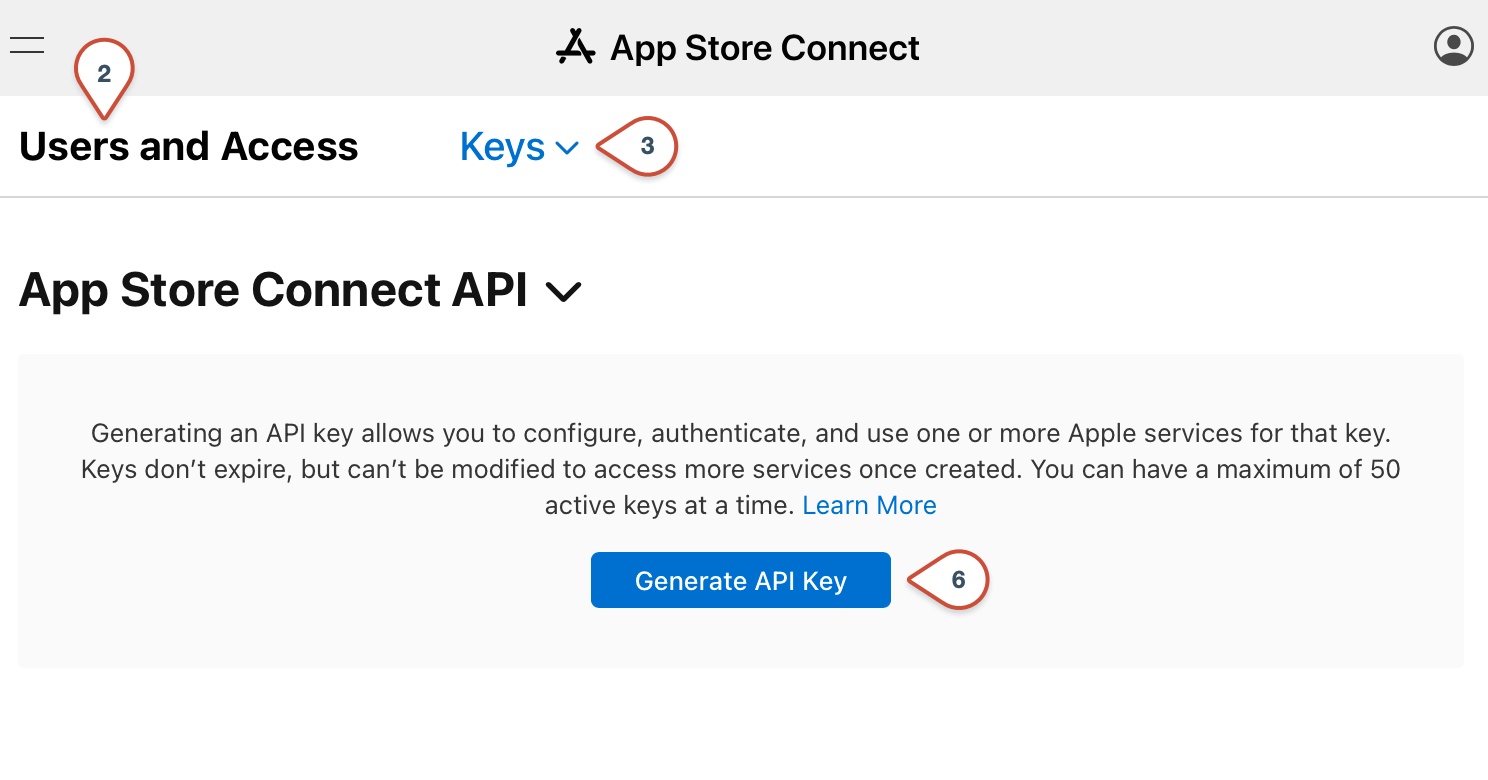
- Select Users and Access.
- Open the Keys top tab.
- In the left tabs under the Key Type heading, select App Store Connect API
- If this is the first time you open this section, click on the Request Authorization button, read the agreement, and then click Submit
- Click the Generate API Key button.
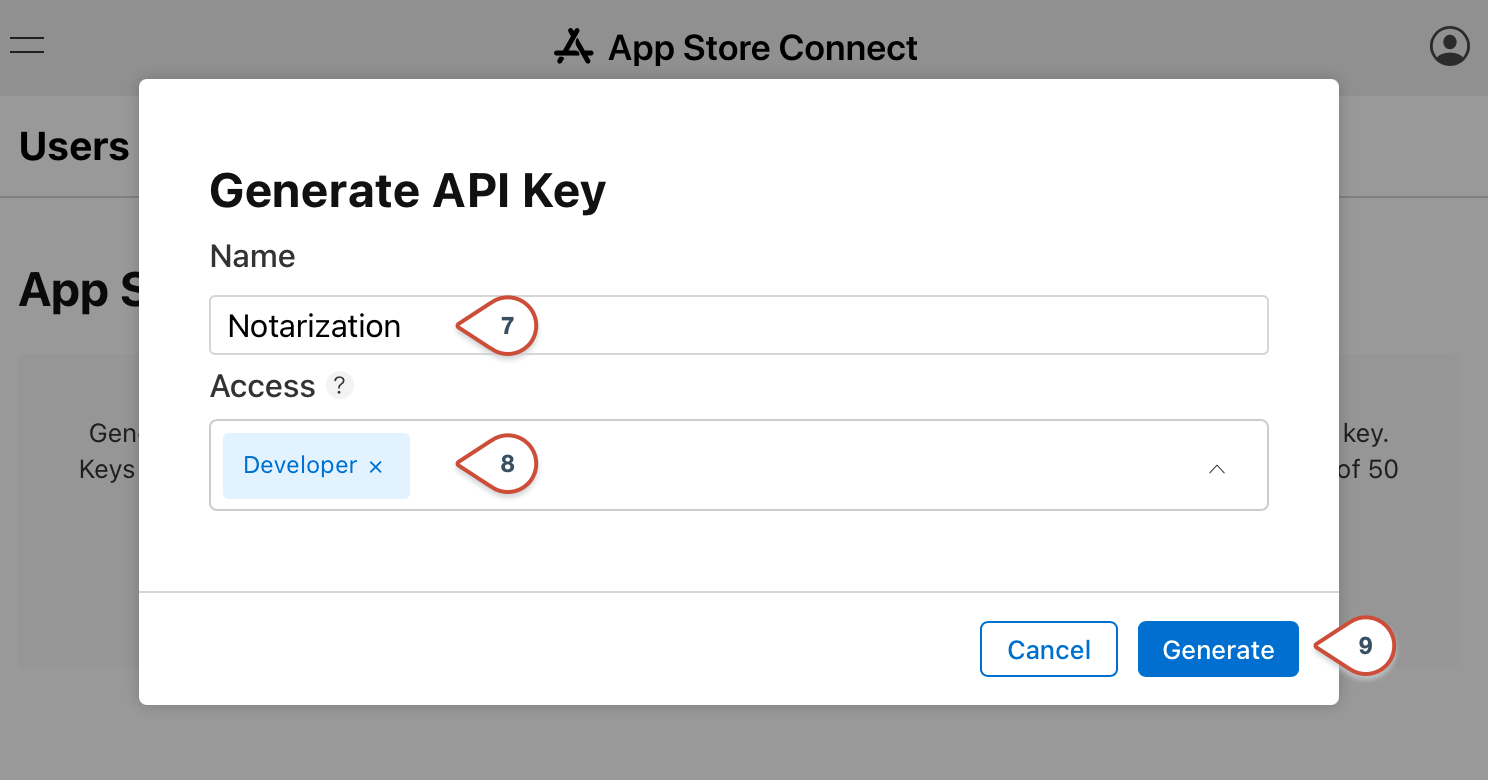
- Enter a descriptive name for the new API Key
- Select access as Developer so that the key can be used to notarize applications.
- Click on Generate to create the new API key. This should take a few seconds to generate the key pair.
- A new API Key row should appear. Take note of the Key ID value in the row as well as the Issuer ID UUID value in the upper-left area of the screen.
- Click on Download API Key. You can only download it once, thus a warning for this should appear. Click on Download.
- Store the downloaded API key in a safe place. Do not change its file name as some command line utilities would depend on it.
Install the API Key
Now with the API key file on hand, it’s time you install it to the CD machine. Place a copy of the file in one of these directories:
./private_keys${HOME}/private_keys${HOME}/.private_keys${HOME}/.appstoreconnect/private_keys
Note that the first one in the above list is relative to the current working directory of the notarization command. Whereas the latter three are relative to the home directory of the local user that runs the build system.
Test the API Key
Use the following command as the build job user account to test out whether you’ve configured the API key correctly. When configured correctly, it would show the list of iTunes providers available to the API key.
xcrun altool --apiKey <key-id> --apiIssuer <issuer-uuid> --list-providers
You can find the value of key-id in the private key’s file name as well as the App Store Connect page where you downloaded the key from. Likewise the issuer-uuid is the UUID value shown in the upper-left area of the App Store Connect page that lists API keys.
Configuring App-Specific Password for Notarization
When it comes to automating build jobs, app-specific passwords are best when it is granted from a technical user. That is, a user account that does not belong to a natural person. This is also known as a system account or a service user account.
Before you begin to setup app-specific passwords for notarization, you’ll need either of the following at hand as part of the technical user setup:
- An e-mail address to receive e-mail and a cellular phone number to receive SMS.
- A pre-existing Apple ID, notably one that is not used for anything else apart from the CD process.
Provision User to App Store Connect
- Login to App Store Connect as a user with admin rights on the ADP account.
- Select Users and Access.
- Open the People top tab.
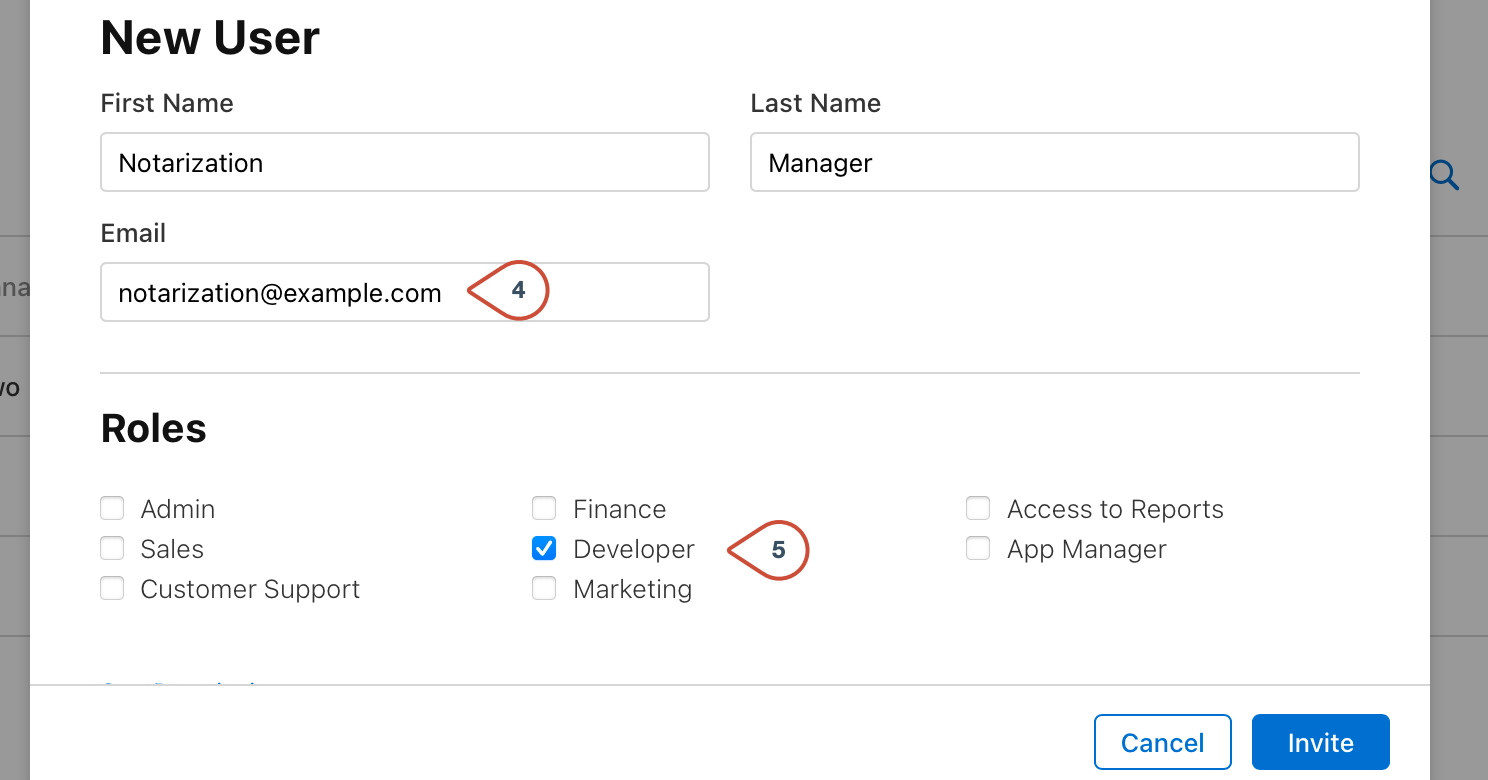
- Enter the technical user’s name and e-mail address. The e-mail address must not have a plus sign (
+) inside it. - Tick the Developer role.
- Click on Invite.
Afterwards login to the technical user’s e-mail account and look for the invitation e-mail. Accept that invite to proceed. Note that if the e-mail address is not already associated with an Apple ID, you would be prompted to create one in order to accept the invite. This is when you would need the cellular phone number to accept a validation SMS as part of the account creation.
Create an App-Specific Password
- Open the Apple ID account page and login as the technical user.
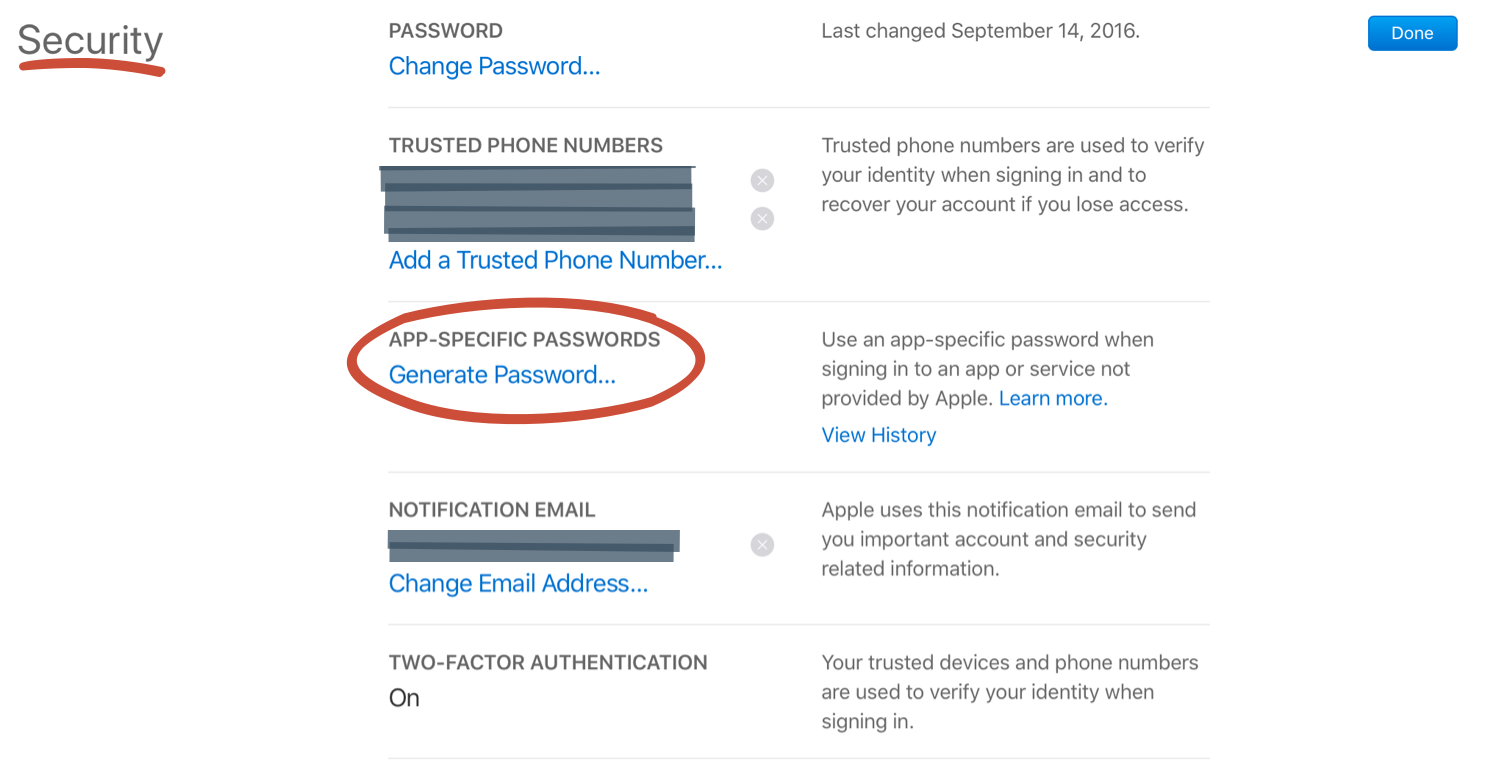
- Look for the Security section and then click on the Edit button within it.
- In the App-Specific Passwords section click on Generate Password…
- Enter a descriptive name for the password. A good name would be “App Notarization”.
- Apple would create a password and show it to you. Copy this password and save it in a safe place. You can only see it once; once you click the “Done” button to dismiss the dialog, Apple won’t show the password to you again.
Refer to Support Note HT204397 for more information on app-specific passwords.
Test the App-Specific Password
With the password at hand, now it’s time to test it. As before, use the --list-providers sub-command of altool to test the technical user e-mail and app specific password shown below.
xcrun altool --username <technical user email> --password <app-specific pasword> --list-providers
When the password is valid, the above command would show the list of iTunes providers available to the specified user. If the user has access to several ADP accounts or also has access to manage iBook stores, then the respective provider names would be listed here.
Using the App-Specific Password
I’m going to use Jenkins Pipeline as an example on how to use the app-specific password inside your CD jobs. If you use a different CD software, there should be a similar method to provide secrets securely to build jobs.
Jenkins has a secret text concept to securely store small bits of texts and inject them into the build job. Then you can configure a build step to have these secret texts as environment variables.
For example, you can use the Add Credentials function to store the technical user’s Apple ID and app-specific password, as follows.
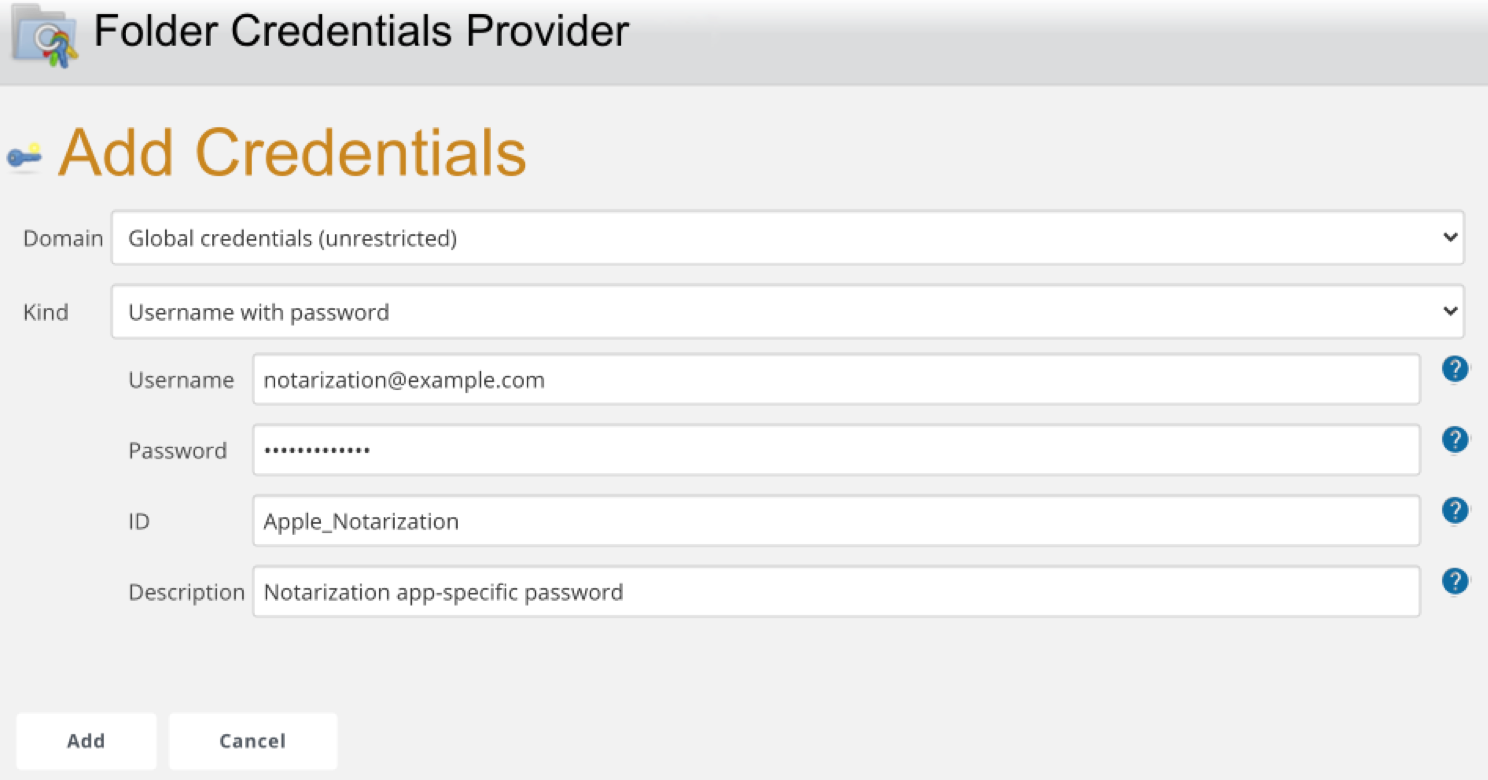
In turn, the withCredentials command in the Pipeline’s Groovy script to expose the app specific password into shell commands. The following sample snippet would provide the Apple ID and password into the altool command via the NOTARIZATION_LOGIN and NOTARIZATION_PASSWORD environment variables, respectively.
withCredentials([
    usernamePassword(
            credentialsId: 'Apple_Notarization',
            usernameVariable: 'NOTARIZATION_LOGIN',
            passwordVariable: 'NOTARIZATION_PASSWORD'
        )) {
        sh '''#!/bin/bash
        xcrun altool --username "${NOTARIZATION_LOGIN}" --password "${NOTARIZATION_PASSWORD}" --list-providers
        '''
}
Next Steps
Now that you know how to configure credentials securely into build jobs, now it’s time to automate notarization as part of your continuous delivery pipeline. You can get up to speed quickly by using my packaging and notarization script that you can readily integrate into just about any CI/CD software. The script automates building disk images containing a macOS application bundle, notarize the disk image, and staple the notarization result onto it so that it can be validated off-line. You can also use the script as a base for your own more advanced packaging and delivery workflow.
Be sure to check out my other articles on notarization. Take care!

Great work, it really helped me. Appreciate !!!