You’ve just enabled hardened runtime in your Developer ID application. Primarily to get your app notarized which would likely be required in the upcoming new release of macOS.
After a few rounds of testing (and a number of runtime exceptions later), you’re ready to notarize your app. You fire up Xcode Organizer, clicked Distribute App, Developer ID, then Upload, and boom – Xcode yelled back at you:
“Autoupdate.app” and “fileop” must be rebuilt with support for the Hardened Runtime.
Enable the Hardened Runtime capability in the project editor, then test your app, rebuild your archive, and upload again.
You thought you’ve already enabled hardened runtime for the application. But Xcode complains saying that hardened runtime is not enabled.
Now what?
If you use the Sparkle Framework to distribute updates of your macOS application, then read on.
The issue above came from the helper application bundle which comes with Sparkle. This app runs just after Sparkle downloaded the new version of your app in order to replace the currently running version and restart it.
Unfortunately that app is not yet configured for the hardened runtime in the pre-compiled distribution as of Sparkle 1.21.3. What makes things worse, there’s no documentation on Sparkle’s integration guide on how to use it with a hardened runtime application.
You start to wonder: should you move away from Sparkle? But that implies replacing a good amount of server-side infrastructure as well. That’s a lot of work to undertake. Is there any other option? Simply don’t notarize? But wouldn’t it stop the app from working smoothly under Catalina?
What if you can have hardened and notarized applications yet still use Sparkle’s awesome auto-update mechanism? What if you can notarize your app and then business as usual?
Yes you can.

Hardening Sparkle
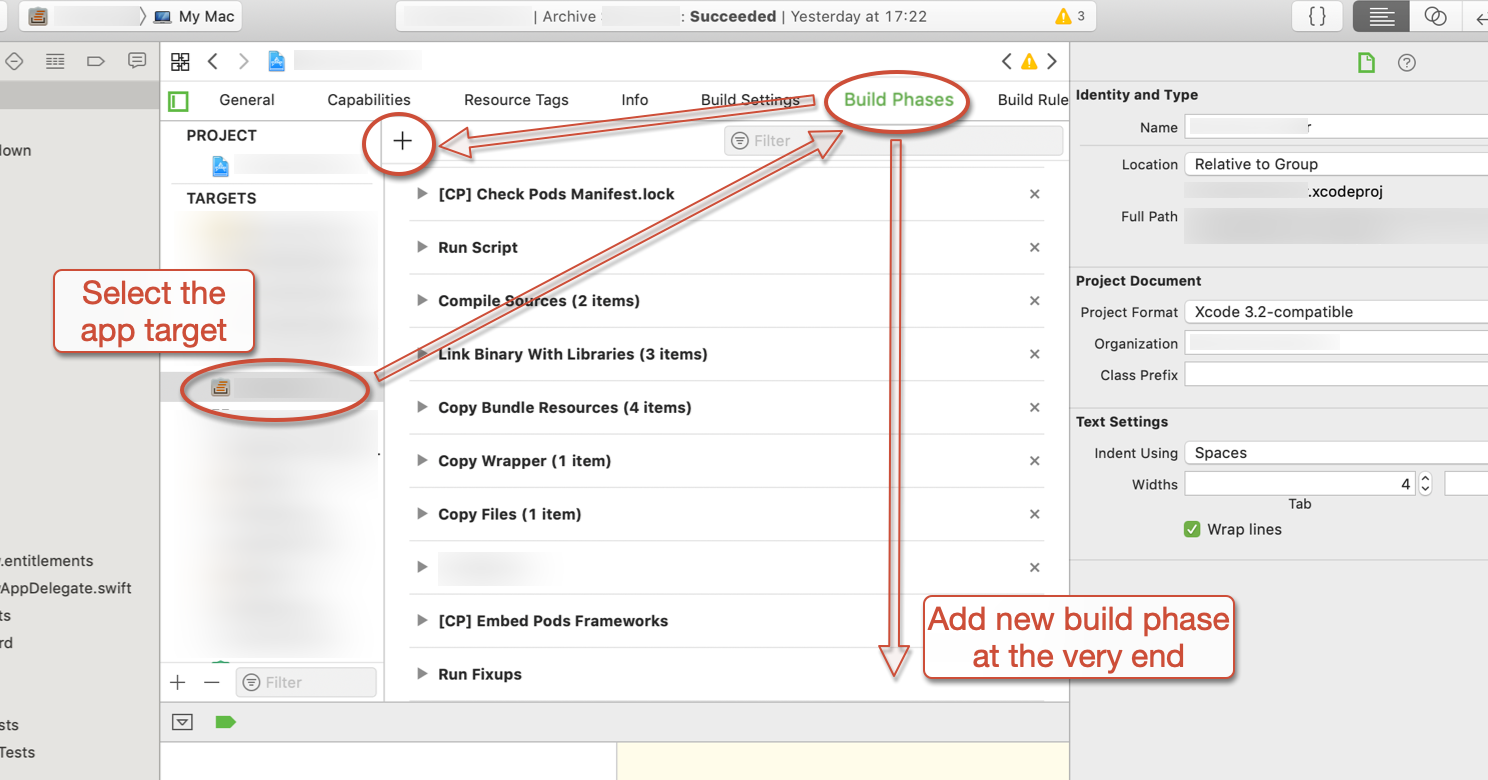
What you need to do is to re-sign Sparkle’s helper app to your credentials. In the same code-signing command you also tell it that you want to use the hardened runtime. Fortunately as of Sparkle 1.21.3, you don’t need to specify any entitlements nor runtime exceptions when signing these binaries. Do this as a custom build step, at the very end of your build phase.
Follow these steps to add the signing script:
- Open the Xcode project (or workspace).
- Highlight the target.
- Open the Build Phases tab
- Click the “+” button and select New Run Script phase to add a custom build script at the end.
- Paste the following
bashcommand in that new build phase script. This is a code-signing option command to re-sign theAutoUpdate.appbundle inside Sparkle. The-o runtimeparameter enables hardened runtime whereas the--deepparameter ensures that thefileopbinary inside that app bundle gets the hardened runtime as well.123codesign --verbose --force --deep -o runtime \--sign"${EXPANDED_CODE_SIGN_IDENTITY_NAME}"\"${BUILT_PRODUCTS_DIR}/${WRAPPER_NAME}/Contents/Frameworks/Sparkle.framework/Versions/A/Resources/AutoUpdate.app" - If the new build phase is not added at the end, drag it all the way down to the very, very end. You wouldn’t want anything else to mess around with your app bundle.
- Finally Archive your app.

Should notarization fails with a “… must be rebuilt with support for the Hardened Runtime” again, try checking the built products and see if the application bundle or binary being called out by the error message has the hardened runtime enabled.
The following bash command would check whether an application has hardened runtime enabled.
|
1
|
codesign -vvvd <em>YourApp.app</em> 2>&1 | grep "Runtime Version" |
That’s three vs in the codesign argument. If it outputs something like “Runtime version x.y.z” then hardened runtime is enabled for the application bundle.
Be sure to check the application bundles and binaries that are inside the .xcarchive bundle and not the ones in your built product directory. There could be subtle differences and the best way to make sure is to check the exact files that would be uploaded to Apple’s notary service.
Next Steps
Of course, notarize your app. At least manually first using Xcode’s GUI. Then if you have an automated build system, integrate this to your automated builds.
(By the way, here’s a guide on how to include notarization into your continuous integration system – whatever that may be).
Then test Sparkle’s auto-update whether it can update your notarized and hardened runtime app from a non-hardened runtime one. Mainly to ensure that the hardened runtime requirement to Sparkle’s helper apps do not interfere with the update process.
Finally, notarize your Developer ID apps before Catalina goes live. There’s little reason not to.

Thank you for the write up. –deep did not work for me. I had to re-run the signing on the Actual AutoUpdate.app inside the bundle.